Table of Contents
The Problem Every Church Audio Engineer Faces
Every week feels like starting from scratch. One Sunday the mix sounds solid, the next it’s all over the place — vocals too hot or buried, drums are to loud, the instruments have disappeared, and your livestream distorted and you only hear the piano and that one vocalists who is out of tune. You try tweaking EQs and adding compression, but you can never seem to get consistently good mixes.
The truth is, the problem isn’t your mixing skills or your gear — it’s your gain structure. This one step, often skipped or rushed, is the foundation of every mix. When it’s wrong, no amount of EQ, effects, or fader rides can fix it. But when it’s right, your mix immediately becomes clearer, more consistent, and easier to manage.
Getting your gain right doesn’t take fancy equipment or hours of extra work. In this post, I’ll walk you through six simple steps to set your gain structure properly so your mixes sound better week after week — both in the room and online. And once you understand it, your volunteers can repeat the process with confidence too.
Why Gain Structure Matters in Church Audio
In the studio, engineers can spend hours tweaking every detail until the mix is perfect. In church audio, you don’t have that luxury. You might get 30 minutes of sound check with a rotating team of volunteers — and the mix still needs to sound good in the room and online.
That’s why priorities matter. Too often we chase EQ settings, effects, or fader moves when the real problem is gain. Every decision you make downstream — compressors, buses, and even your master output — is directly shaped by how you set input gain. If your gain structure is inconsistent, everything else will be inconsistent too.
The good news? When your gain structure is solid, mixing gets easier, your broadcast sounds cleaner, and your volunteers have a clear standard to follow week after week.
Now that we know why gain structure is important, let’s look into some key components regarding how consoles sound and metering:
Analog vs. Digital — The Foundation
There is a difference between how Analog processes sound versus Digital. One is not better, but they are different. This is important to know if you are wanting a specific tone within your mix.
- Analog Audio is continuous sound waves. It tends to sound “warm” and forgiving when you start clipping the sound.
- Digital Audio turns sound into numbers. It’s cleaner, more precise, but has a hard limit (0 dBFS) where it clips.
Most churches today use digital consoles, so your meters are showing dBFS (Decibels Full Scale). But many of the tools we use — EQs, compressors, effects — were designed around analog line level (+4 dBu). That’s why knowing how these systems connect matters.
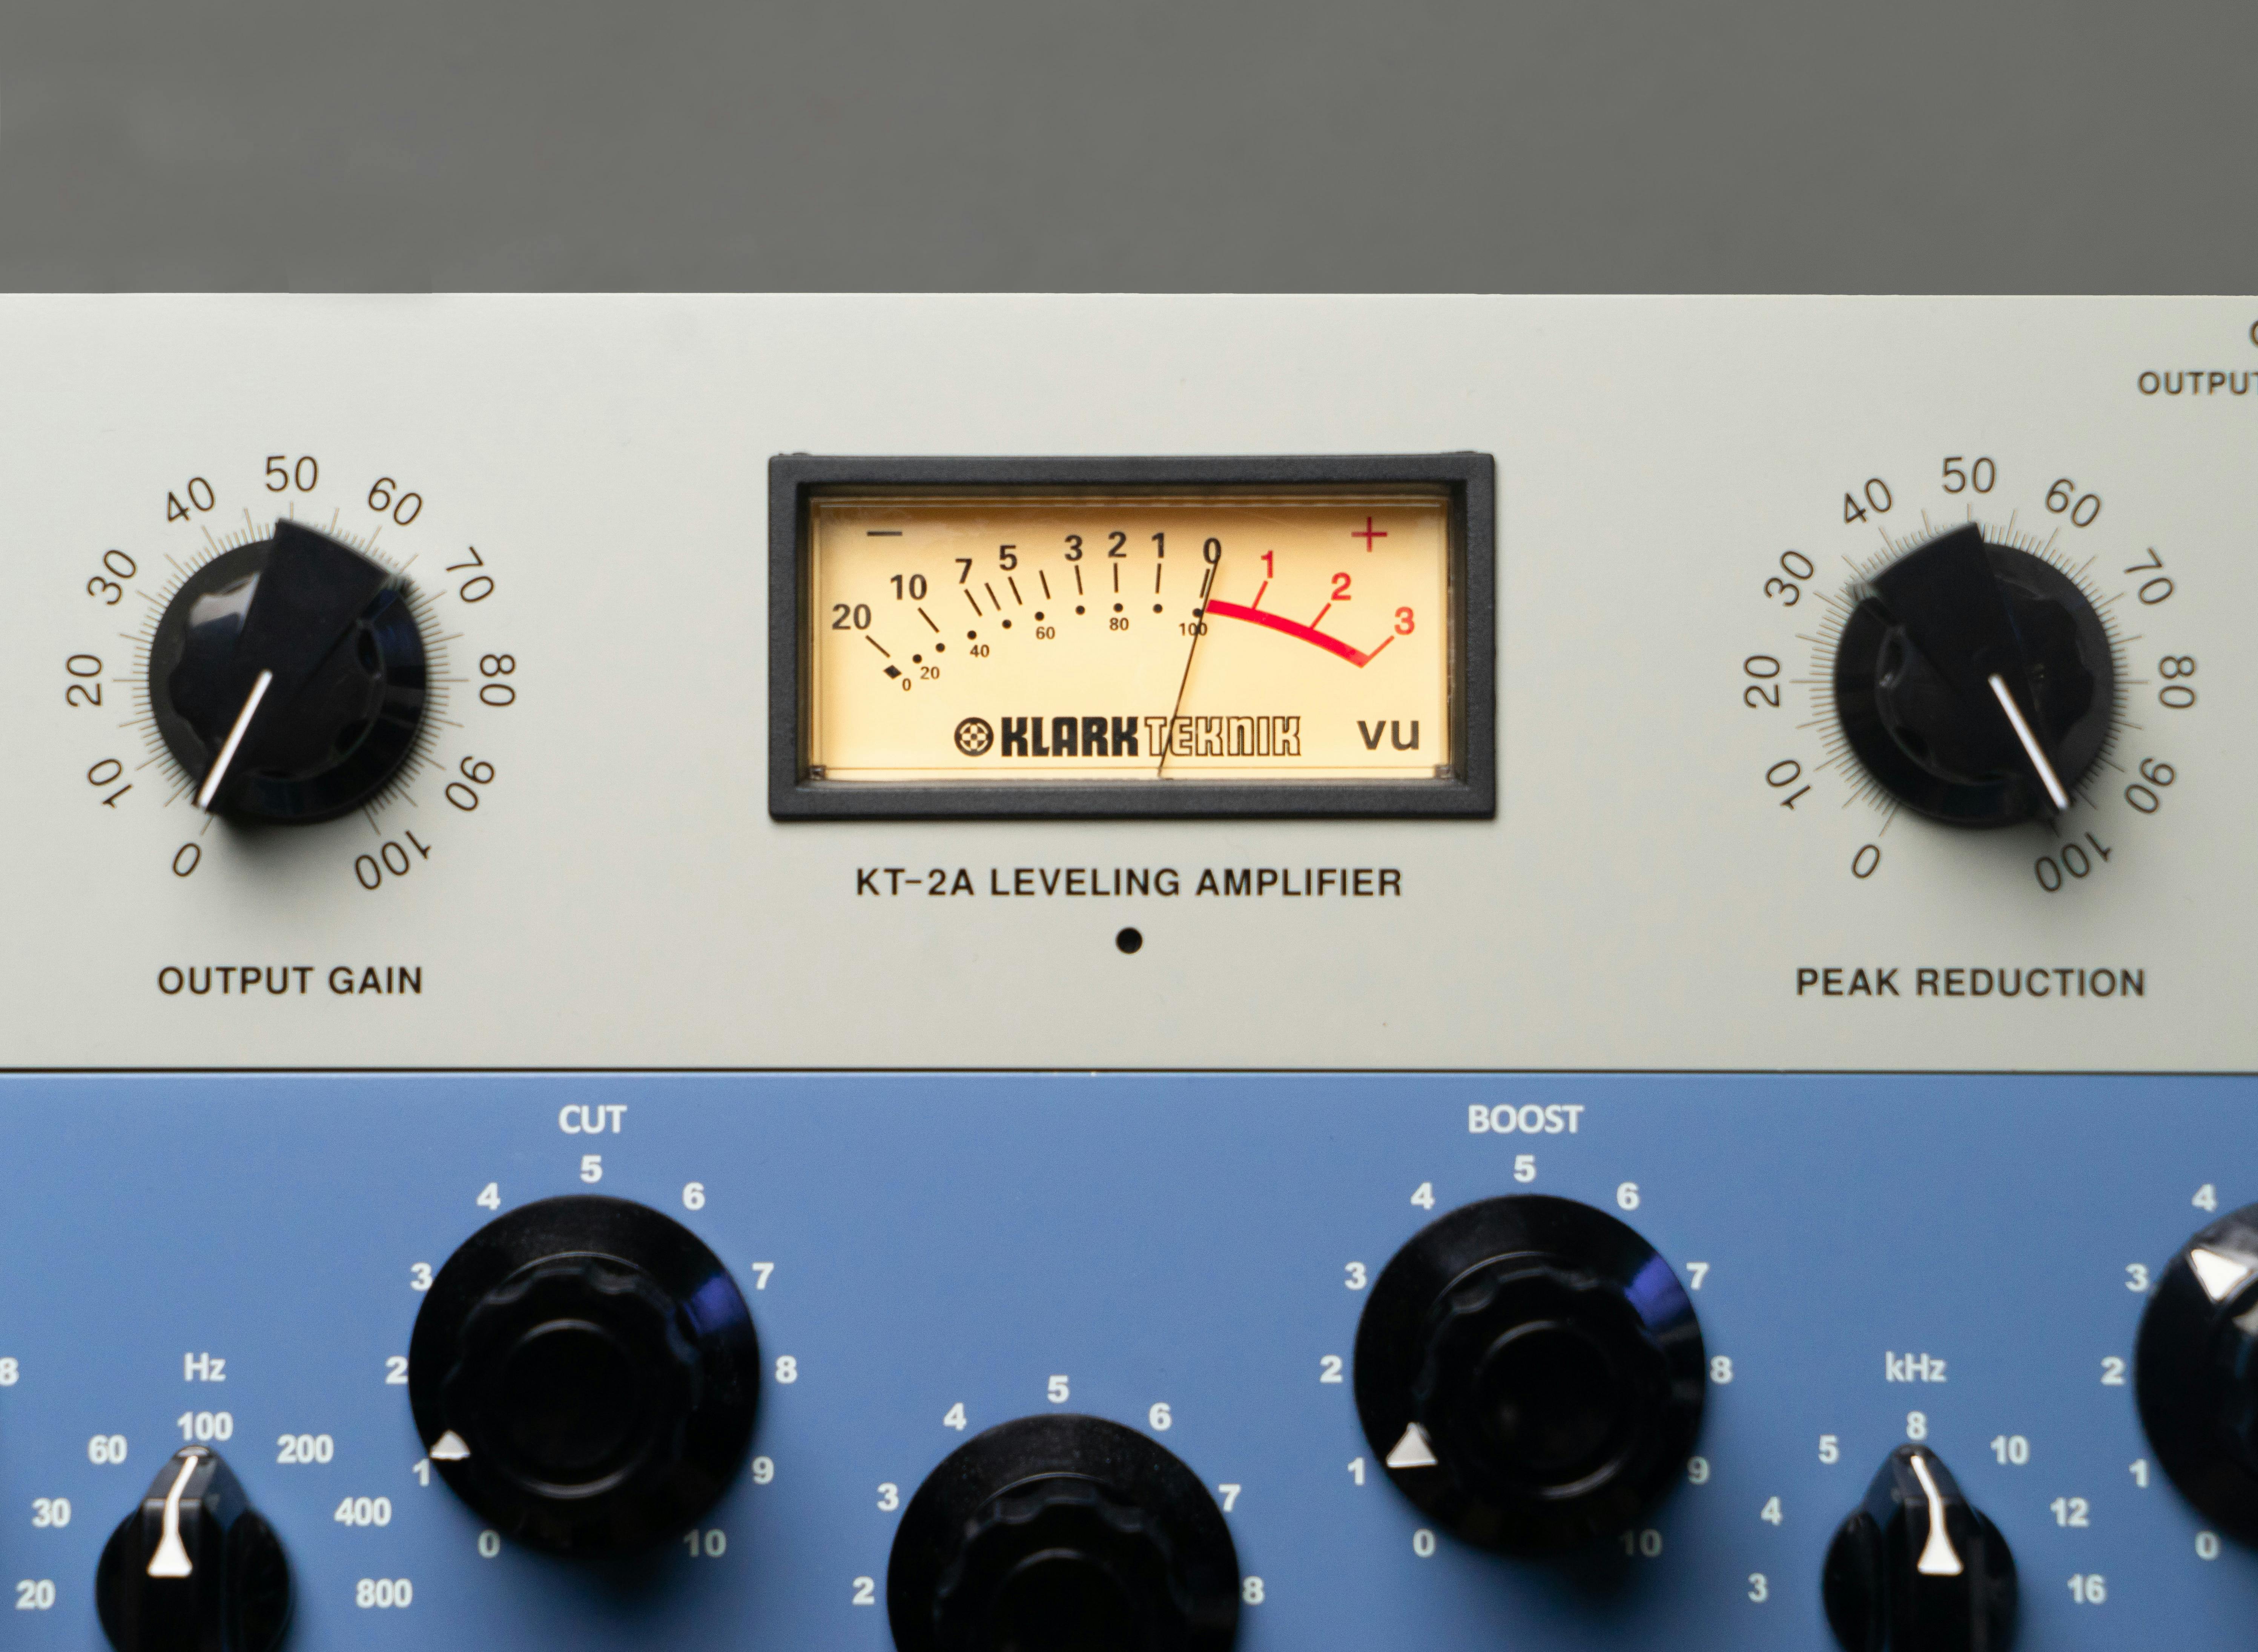
The Meters You’ll See
- dBu (Decibels Unloaded):
- The original “line level” standard. +4 dBu = strong enough signal for professional audio gear.
- In church terms: Every piece of gear you use was calibrated for level”. This is the level it wants to see to sound best.
- VU (Volume Units):
- RMS (Root Mean Square)
- A digital way of showing average loudness, similar to VU but used in DAWs.
- RMS values usually show 2–4 dB lower than VU on the same signal.
- In church terms: If you’re mixing in a DAW, RMS gives you the “human ear” perspective.
- dBFS (Decibels Full Scale)
- Used in all digital consoles and DAWs.
- 0 dBFS = digital clipping (instant distortion).
- In church terms: This is the one you’ll be looking at most. Keep your signals in the “sweet spot,” not near 0.
How They Relate
- The max level you can get for analog is about +24 dBu. If Line Level is +4 dBu, then that is about 20 dB of headroom.
- 0 VU = +4 dBu = around -20 dBFS = about -22 to -23 dB RMS
- That’s your target input level.
So if your console is showing -20 to -18 dBFS on average, you’re right at line level. That’s where your console, compressors, EQs, and effects are designed to work best — and where your mix will feel balanced and clear.
What you Nee To Know
One mistake people often make is trying to set every input to the same number, like -18 dBFS. The truth is, not all instruments behave the same.
For example, percussive instruments (like snare or toms) have a fast attack that meter higher, while sustained sounds (like electric guitar or keys) hold longer and sound louder even at lower peaks. That’s why your meters matter — they show you how each source is behaving so you can set the right level.
Bottom Line
Here is what you need to know:
- Hitting that sweet spot (-18 to -20 dBFS average) means your mix will sound cleaner, your equipment will work better, and your volunteers will have a consistent starting point every single week.
- Pay attention to the meters to see how the instrument or vocal is acting
- Instruments with faster attacks will peak higher and sustained instruments will have lower peaks
6 Steps for Proper Gain Structure
1. There is a Correct Way for Gain Structure
In my opinion, establishing the right gain structure is crucial. Following a musical performance, maintaining appropriate gain levels becomes critical in gain staging and achieving a high-quality mix. Low audio signal can result in introducing too much background noise (noise floor), while excessive gain introduces “low-resolution” mixing, even though the term isn’t technically accurate—it touches on another subject entirely. Properly managing gain from the start ensures downstream processing adjustments are minimal, as consistent input levels reducing the amount of effort needed to get consistently great mixes.
2. Aim for Line Level
When we are setting audio levels, our target should be Line Level. Why should we care about Line Level if we are in the digital world? It’s true that Line Level is traditionally associated with analog systems, however it remains the benchmark we should target. Every piece of gear is calibrated and is optimized for Line Level signal. Not only will aiming for Line Level make sure your equipment is functioning at its best, you will build consistency in your mixes, no matter the platform, whether you are on your own or you have a team of volunteers.
3. Each Instrument is Different
Previously, I mentioned we should be targeting -20 dBFS or -22 to -23 RMS. What I have seen online, this is where I see 99% of the people get this part wrong. They will suggest that peak levels should be -18 dB. However, there is a small amount of people that say to shoot for an average of -18 dB. While neither approach is entirely precise, I lean towards advocating for the average method. Each instrument response very differently than the next. Drums and Guitars are very different. Percussion instruments typically produce higher peak levels to maintain the same average volume as a guitar.
I’ve meticulously analyzed each instrument’s peak levels in dBFS to align closely Line Level. There is nothing else like this anywhere else, and it’s yours for free. Just sign up for the email list to receive your free 5 Simple Step Guide to Transform Your Broadcast Audio and you will receive a Gain Structure companion guide as well.
4. You are working in a Digital audio Workstation (DAW)
It doesn’t matter what DAW you work on. The application is the same. You should have a RMS meter that comes with your DAW. Your target is between -20dB to -23dB RMS
If you have or want to download a VU Meter, Calibrate your plugin to register 0 VU at -20dB. The default setting is -18dB, but changing the settings to -20 dB will give you extra headroom. This may take some adjustment if you are used to mixing loud, but your mixes will be better and more consistent.
5. Gain Structure on a Digital Console
Most Digital Consoles measures audio in dBFS. I am going to assume you do not have access to a VU or a RMS meter. So how do you know if audio is at Line Level. One advise you probably get is “don’t clip”, but that is not helpful since there are many factors you need to consider if you are mixing in a live environment for Front of House or Back of House. I will be producing more content about these factors. Metering audio is not as a simple as one size fits all.
There are digital consoles that have Analog metering. This is different than dBFS although the principles still apply. Percussive instruments need to be between 5-10 dB’s above 0 dB where as other instruments need to be between 0-3 dB’s over 0. Remember these are Peak Levels, not average levels. I stress that point because you may have very dynamic vocalists and their peak level may be very high compared to their average level.
6. Gain Structure on an Analog Console
Almost all Analog consoles have metering that shows negative numbers ascending to +10dB. There is a 0dB mark that you are aiming for. However, this is not a VU meter but a peak meter. It reacts differently than a dBFS Meter but it’s still measuring peak levels. Signup for my mailing list to get the free guide to hit the correct audio levels every time.
Now you know the truth about how important audio levels and gain staging is to your mix. If you can internalize the levels in the Gain Structure Guide, you can go into any situation and get a great mix whether you know the console or not. I have been in many new environments where I had to test my theories and everything I have mentioned in this post has been proven true. I challenge you to set a standard in mixing and gain structure. You will be a better mixing engineer whether you are live or in the studio.
References
- https://en.wikipedia.org/wiki/VU_meter ↩︎
- https://support.biamp.com/General/Audio/Gain_structure%3A_input_and_output_levels ↩︎